Tuesday, December 31, 2013
Is your New Year's Resolution to be more organized in 2014?
If so you've come to right blog. Each week in January, starting tomorrow, I'll be posting tips on organizing your sewing space.
Let's face it, our sewing spaces can get out of hand really fast. These tips will help keep your room organized and clean as you go!
Wishing everyone a wonderful New Year!!!
- Kat
Monday, December 30, 2013
Supreme Slider Review
Before I bought it, I'd been thinking about getting the supreme slider for a while. But to be honest the price tag had me holding off. Then one day I was watching a tutorial by Leah Day (I adore her) and she talked about the slider and raved about how good it is. The slider moved up a bit in my 'must have it'.
I was hoping to find one at the AQS show where I could try it before I bought it. Once at the show I overheard classmates talking about how great it was. My interest heightened. But I still had not found a booth with a demo.
Finally I saw a vendor removing halos from her machine. I asked her if I could try them. I'd seen them around and was curious about them. I sat down at her machine to demo the halos. Immediately I thought "Wow. This fabric moves so well, it's practically gliding across the table." I stopped sewing. I lifted the fabric. Yup! There was a supreme slider underneath. I was in LOVE. I left that booth with the queen size slider and two halos. Yes 2. This lady recommended stacking the halo's for more grip, and better control/comfort.
Even though I had heard all these great things about the slider, and I had inadvertently tried it, I was still a bit nervous about using it once I got home. Would it really stick to my machine? Especially after removing and replacing it many times? Would the fabric still glide? Or was the vendor using some kind of magic fabric. We've all been there...a product looks great in a demonstration....but once you get it home, you just can't seem to get it to work as well as the demo.
All my worries were for nothing. The slider is amazing! It does stick even after removing it many times. I always store it in the plastic tube that it came in when I'm not using it. After a while the fabric and thread dust builds up on the bottom and you have to clean it, but it's been really simple to clean by rinsing under water and letting it air dry. It always sticks again once dry.
I use my Supreme Slider every time I free motion quilt. I can't imagine quilting with out it. I give it an A++++
Happy Sewing..and Happy New Year! May your year be filled with many fun quilting, sewing and embroidery projects.
Monday, December 23, 2013
S is for Staple
Our remodel is coming along. Now that the cabinets are done, we are moving onto the floor.
We had already ripped out the carpet before we painted the walls. And now we tore out old vinyl floor, and spent most of the day removing staples from the subfloor.
Here are some shots of the current floor. S is also for subfloor cause that's what we are living with right now.
Can't wait to install the new hardwood floor! We'll get there. Eventually.
It' would be great to never see another staple again for a while.
-Kat :)
We had already ripped out the carpet before we painted the walls. And now we tore out old vinyl floor, and spent most of the day removing staples from the subfloor.
 | ||
| Staples, staples and more staples. |
Here are some shots of the current floor. S is also for subfloor cause that's what we are living with right now.
 |
| Whooops. Guess I forgot to bring in my patio furniture. |
 |
| Photo bombed by DH, sweeping up staples. |
 |
| Such a glamorous kitchen floor. |
 | |
| We haven't decided what to do about these columns yet. |
Can't wait to install the new hardwood floor! We'll get there. Eventually.
It' would be great to never see another staple again for a while.
-Kat :)
Monday, December 16, 2013
Want new cabinets??
Are you looking for an inexpensive way to refinish your cabinets? We've lived in our house for about 10 years. I've never liked the oak cabinets. And since we are remodeling the first floor of the house, DH finally agreed to paint them (which was much cheaper than buying new cabinets).
We used a product by RUST-OLEUM called Cabinet Transformations. It's fabulous (This is my personal opinion, they are not paying me review this product). It was about $60 per kit and we used two kits. So for $120 dollars (plus new hardware) we got amazing 'new' cabinets.
The first step in the kit is the de-gloser. You wash all the cabinets with the de-glosser. BONUS: No Sanding!
Next up you apply the paint/stain. We used two coats of the paint/stain.
The 3rd step is a glaze that makes the grain pop.
The final step is the sealer, it seals everything and makes the cabinets shiny.
Overall we felt the process was very easy, I loved that we didn't have to do any sanding. And now one month later that cabinets still look great. So far the paint/stain is holding up really well. Let me know if you have used this product on your cabinets and what you thought of the entire process.
-Happy painting! Kat :)
We used a product by RUST-OLEUM called Cabinet Transformations. It's fabulous (This is my personal opinion, they are not paying me review this product). It was about $60 per kit and we used two kits. So for $120 dollars (plus new hardware) we got amazing 'new' cabinets.
The first step in the kit is the de-gloser. You wash all the cabinets with the de-glosser. BONUS: No Sanding!
Next up you apply the paint/stain. We used two coats of the paint/stain.
 | |
| This is what it looks like after only one coat of the paint/stain. |
The 3rd step is a glaze that makes the grain pop.
The final step is the sealer, it seals everything and makes the cabinets shiny.
Bye bye oak cabinets....
 | |||||||
| Here is the BEFORE photo |
Hello new fabulous cabinets!!!
 |
| The finished cabinets. |
 |
| Love love this color. |
 | |||||
| Someday this remodel will be finished and my countertops will be clean again. |
-Happy painting! Kat :)
Friday, December 6, 2013
Sunday, December 1, 2013
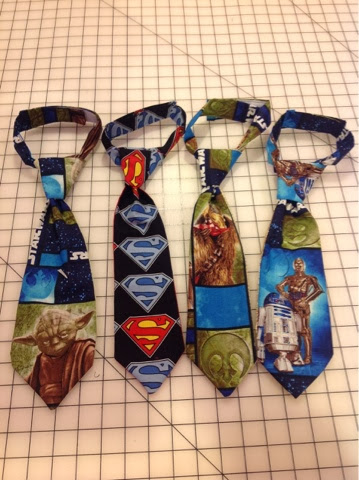
Last Christmas present...done!
Of course I tried to use the pattern from one person and directions from another. That didn't work out so well. I ended up sewing and un-sewing each step multiple times. What should've been a quick project took me over 4 hours. Lesson learned.
I also discovered I can't tie a tie knot. So I faked it and hand stitched the knots in place. I think they look great. And I can't wait to see C open them on Christmas Day.
Wednesday, November 27, 2013
Sunday, November 17, 2013
Sunday, November 10, 2013
Embroidery on wood
Today's tutorial is how to embroider on wood. Yes, wood. It's
unexpected and makes a fabulous gift. People will be amazed that you
stitched on wood. The trick to this is Balsa wood.
noun: balsa wood
- a very lightweight wood used in particular for making models and rafts.
- the fast-growing tropical American tree from which this wood is obtained.
Supplies
Balsa Wood -1/16th thickness
Balsa Wood -1/16th thickness
Needle - 75/11 universal
Stabilizer - adhesive stabilizer
Thread - embroidery thread
Emb. Design (I used the built in font from my machine)
Unfinished wooden jewelry box
Scissors
Xacto knife
Paint & brushes
Xacto knife
Paint & brushes
Glue
Balsa wood comes in different thickness, you want to purchase the 1/16th thickness. Be sure to buy a piece that's wide enough to cover the top of the jewelry box.
Trace the shape of the box onto the Balsa wood. Use the
Xacto knife to gently cut the shape out. Balsa wood cracks easily...take
your time and be gentle.
Paint the jewelry box and the Balsa wood in the same color. Let them dry. I used a fun acrylic glitter paint (also found at my local craft store).
Hoop a piece of adhesive stabilizer. I used Perfect Stick
by Floriani. Place the Balsa wood on the stabilizer...center the design. I used a built in font from my machine to create the initial. (note - if you don't have adhesive stabilizer you can use a
piece of tear-a-away and then use a spray adhesive. Hoop the cut-away stabilizer and spray the back of the Balsa wood with the spray adhesive. Place the wood onto the center of the hooped stabilizer)..
Use a 75/11 universal needle. Use your favorite embroidery thread. Stitch out the design.
Once
done carefully un-hoop the stabilizer and using scissors carefully cut
the stabilizer away from the Balsa wood. Do not tear it away as you might crack the wood. Start by cutting around the wood leaving a 1/2 inch or so of stabilizer around the wood.
Then turn the wood over, and using an knife carefully cut away the rest of the stabilizer.
Then turn the wood over, and using an knife carefully cut away the rest of the stabilizer.
Since I used adhesive
stabilizer I left some stabilizer on the back, to help keep the wood
from breaking. Be sure to trim it away from the edges of the Balsa wood, exposing about 1/4 inch of the wood.
Glue the Blasa wood to the top of the jewelry box. Gently brush away any glue that comes through the needle holes with a wet paper towel. Let it dry.
Thursday, October 24, 2013
Build-a-Boo embroidery designs
Available now, just in time for last minute Halloween projects...Build-a-Boo embroidery designs.
Download the "B" for free.
Purchase any two "O's".
Stitch them out side by side and you've created your very own Boo.
There are 10 different "O's" to choose from. Visit CalicoCali.com to see them all!
Wednesday, October 23, 2013
iPhone case makeover
iPhone case makeover
First
step - removing the fabric backing from my case. I gently picked at
one corner of the fabric with my finger nail and I was surprised at how
easy the fabric came up. It was very easy to gently pull the fabric
back and remove it from the plastic case.
I
tried to use goo-gone to remove the dried glue from the plastic case,
but it didn't work. So I just left the dried glue on the case.
Next,
using the old stained purple fabric as a template, I carefully traced
the shape onto my new fabric. I had decided to fussy cut out one of the
skulls from the Alexander Henry 'skullduggery' line of fabric.
Using permanent markers I colored in the rose next to the skull.
Using permanent markers I colored in the rose next to the skull.
Before cutting out the fabric, I traced around the lines with Fray Check and let it dry.
After I cut out the fabric I put more fray check along the fresh cut edges. I did not want to take any chances of having the fabric fray while working on it.
After I cut out the fabric I put more fray check along the fresh cut edges. I did not want to take any chances of having the fabric fray while working on it.
Originally, I thought I would mod podge the new fabric onto the case, but then I remembered that I had Nunn Design UV jewelry resin which I had not tried yet. I decided this would be the perfect project to test out the resin.
I
followed the steps in the kit, first using the glue to adhere the
fabric to my plastic iPhone case. I put the glue on using an old paint
brush. I had a hard time getting the corners to stick down and actually
put a bit of glue on top of the fabric (as if it were mod podge) in
order to get it to stick. I let it dry overnight.
The
2nd step is a sealant, that only needs 20 minutes to dry. Again I used
a paint brush to apply it, but I let it dry overnight.
The
3rd step is the UV gel. The gel was a bit smelly, I recommend doing
this in an area with ventilation. I also wore latex gloves to protect my
skin in case I got messy. Let's face it...I make lots of messes. The
gel itself was very thick and a bit hard to apply. Then again, the gel
that I had was two years old, so a newer bottle might spread more
evenly. After applying the gel with a brush I put the case under my UV
light. It "baked" for 20 minutes. When I took it out, it was slightly
tacky. The instructions said it would continue to harden for the next
two hours. I decided to let it sit overnight.
The
next day it was hard and shiny and pretty. But I could see where I had
applied the gel unevenly. So I did a second coat...again letting the
case harden overnight.
The
end results are great. The case looks cool, and it's unique. The gel
isn't 100% even, but I'm okay with that. I think it turned out fantastic
for my first attempt using UV gel resin.
The
case has also been holding up well to normal every day use. It's been
tossed in my purse, pants pockets, gym locker and even spent some time
in an ice rink and it's just as shiny and new looking as the day I made
it. Overall I love it the case and I'm impressed with the Nunn Design
UV resin. I can't wait to make more stuff with it.
Monday, October 7, 2013
Bye bye rubber duckies
A few weeks ago, I woke up on a Sunday morning turned to my
husband and said..."Hey wanna go to the hardware store and buy a track
light for the kitchen?" Now asking my husband to go to the hardware
store, is like asking me to go to a quilt shop. I knew the answer was going to
be yes.
One hour later we were on our way home with everything we needed to remodel our guest bathroom. But no kitchen track light.
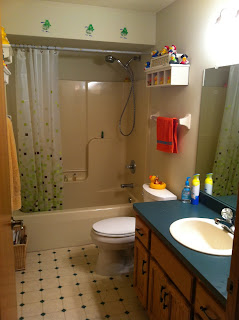
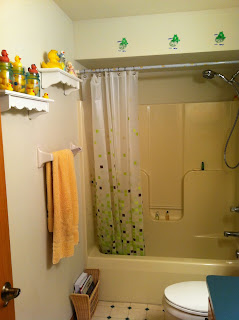
Yup..after 9 1/2 years in this house, it was decided that our ducky bathroom had to go, and we needed a more 'grown up' bathroom.
We wanted the 'new' bathroom to have that fancy hotel bathroom look to it. We started with paint. We used the same paint color as our master bathroom, so that the two rooms would have a similar feel to them.
DH put down the same tile that he used in our camper. I love
that tile. He also installed a new counter top and sink.
We painted the light fixture, mirror and trash can so they would match the oil rub bronze color that the master bathroom features. We also purchased a new faucet in that color. What can I say..we like brown.
The shower curtain is that kind that bowes out so that you have more room inside the shower.
I bought the accessories at Target, and I super love the
small cake plate-like soap dish, where I plan on displaying one rubber ducky at
a time. I might be having a hard time letting go of the duckies.
Viola...new fancy bathroom. Oh and we did go back to get the
kitchen track light too. Yahoo! I'm soo in love with our new bathroom, I can't believe we waited this long to remodel it.
Have a great week everyone!
-Kat :)
One hour later we were on our way home with everything we needed to remodel our guest bathroom. But no kitchen track light.
Yup..after 9 1/2 years in this house, it was decided that our ducky bathroom had to go, and we needed a more 'grown up' bathroom.
Bye bye duckies.
We wanted the 'new' bathroom to have that fancy hotel bathroom look to it. We started with paint. We used the same paint color as our master bathroom, so that the two rooms would have a similar feel to them.
 |
| What doesn't everyone put their toilet in the tub? |
We painted the light fixture, mirror and trash can so they would match the oil rub bronze color that the master bathroom features. We also purchased a new faucet in that color. What can I say..we like brown.
The shower curtain is that kind that bowes out so that you have more room inside the shower.
 |
| Check out the 'jeweled' curtain rings! |
 |
| Hotel soap on the dish for when we have guests over. |
 | |
| Super fun Duckie on the soap dish for when we don't have guests. |
Have a great week everyone!
-Kat :)
Labels:
Remodel
Thursday, September 26, 2013
Embroidery on leaves
Last nite I attended an event at Milwaukee Sewing for the embroidery club that I belong to. The event included an educator from Brother...her name was Barb. She was fantastic, and showed us many things. But she made my night when she showed us these.

Yes that's right...she embroidered names onto faux fall leaves. She uses them as place tags for Thanksgiving.
My mind is spinning with all sorts of ideas for embroidery on leaves now. I'll be stopping at Michaels on my way home to buy some leaves. I can't wait to get into my studio and play!
Happy Thursday everyone - Kat :)

Yes that's right...she embroidered names onto faux fall leaves. She uses them as place tags for Thanksgiving.
Genius.
My mind is spinning with all sorts of ideas for embroidery on leaves now. I'll be stopping at Michaels on my way home to buy some leaves. I can't wait to get into my studio and play!
Happy Thursday everyone - Kat :)
Wednesday, September 4, 2013
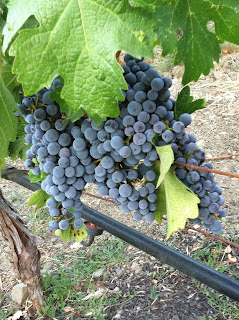
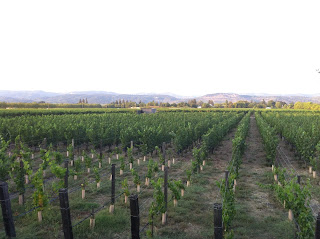
Grape Ape
DH and I recently spent five days in my favorite state,
California! I didn't get
to visit any quilt shops...but I did see lots of grapes.
And of course there was wine.
I also really enjoyed digitizing palm trees and beach scenes
while in sunny Cali. It was the perfect setting.
Those designs and more will be coming soon, as I'm just
putting the finishing touches on my website now. I'm soo excited to share it with you all!
Till next time
- Kat :)
Subscribe to:
Posts (Atom)
About Me

- Calico Cali Designs
- I love all things crafty! Visit my website www.calicocali.com for tutorials, longarm quilting, svg designs, embroidery designs, nail decals, notions and more. Let’s Be Friends! Follow us on Facebook: www.facebook.com/calicocalidesigns/ Follow us on Instagram: www.instagram.com/calicocalidesigns/ Subscribe to our Youtube channel so that you don’t miss out on any of our fun tutorials! I hope you love our designs as much as I enjoy creating them. Happy Sewing Everyone!!! – Kat 🙂
