Thursday, September 10, 2015

Another WIP done!

Back in April of 2011 my Mom and I went to the AQS quilt show in Paducah KY. We had an amazing time. We took a bunch of classes together, and lots of photos.

A few weeks ago I was cleaning out a cabinet in my studio, and I came across an unfinished quilt. It was a small wall hanging, complete with batting and backing..just begging to be quilted. I couldn't remember exactly when or where I had made it, but I knew it was in a class with my Mom.

I searched all the photos on our computer, and then I found it...the photos from the class in KY.
Here are the photos of Mom and I in class with our completed quilt tops.
I still have that hair clip, I made it out of a zipper.

My Mom with her quilt top. I love my Mommy.


I quilted my wall hanging with in a week of finding it, and I'm sooo happy with how it turned out.
The wall hanging on my longarm.
I finished the hand binding on the back while I was camping last weekend, and hung it up the day we got home. I'm soo in love with this. As soon as my Mom finds her's she's going to send it to me for quilting. I can't wait for her to locate it in her pile of WIPs.
Hanging on the wall in my studio.
I also found these photos that I took of the teacher's samples. I can't remember her name, and I can't find my notes from the class (I'm sure I took some)...but at least you can see the beautiful work the teacher did.


I hope you make some progress in your WIPs this weekend. Happy Sewing everyone!
-Kat

Saturday, August 8, 2015

Can we get a pool Dad? - Part 2


Our backyard is currently a giant dust bowl. The dogs have needed a bath every night...but we have hole for the pool! That's right, we are making progress!

DH hard at work.

Okay, if I'm gonna be honest, my husband is making progress. I haven't been involved with the dirt, dust & sand parts at all. But in my defense, I don't know how to operate the digger thingy, and I've been working on a big project for work (It just so happens I work out of the house..but still, it's work)
Dirt!!!
 After getting the hole perfectly dug, my wonderful husband brought home two truck loads of sand. While I was inside working (it's a really big project I swear) he got the sand down and the side anchors in place. I should point out that I did bring him water and grape kool-aid a lot. And, I pestered him about wearing sunblock. So that's kind of like helping. Right???

You can see the pool outline!

 The next step was putting up the side poles that will help hold up the side of the pool. This step was kind of like bowling with the wind. Luckily we have lots and lots of big heavy rocks in our yard, so we used those to help keep the poles upright. Yes, WE. I actually moved about two rocks. See?!? I helped!

Look! It's the digger thingy!
That's the update for now. The next step is to actually unroll the metal pool and attach it to all the parts that DH has already installed. I'll for sure be helping during that part. Then comes the liner, the water...oh and we still need to fix the pump. Okay, okay..my husband needs to fix that. Let's be realistic, we don't want ME trying to fix the pump. That would be a huge boo boo.
Hopefully my next post will be all about the finished pool!! Wish us luck.

-Kat 

Monday, August 3, 2015

Can we get a pool Dad? Part 1

Remember that Simpsons episode where Bart and Lisa keep chanting "Can we get a pool Dad?" over and over again until Homer finally says yes. That was me at the beginning of the summer. The moment it got hot out I decided we needed a pool. I thought about how nice it would be to just jump in at any time we get, like right after doing yard work, or after my runs. But DH wasn't so convinced.

One hot weekend he was working in the yard and I tried to get him to take a break and drive down to the community pool that's here on the ranch. No such luck. That pool is only 10 minutes away..but you still have to change, get into your hot car, drive down there, and then share it with a bunch of splashing kids. Kids love to splash. And scream and yell..and while most days we are fine with that..there are some days when you are just soo hot and tired you want a quiet swim. The only part of the community pool that I really dislike is the drive back home. Because by this time, I'm all cooled off and then subsequently I freeze in the car since the AC is blasting.

Soooo I started looking at used pools online. I figured if I looked hard enough the right deal would come along. After a few weeks I found out that a neighbor whom had recently moved into the ranch had a pool that they just wanted gone. That's right it was free as long as we could move it ourselves and they home owners didn't have to help. The pump was also broken and they had been quoted $150 to fix it.

DH and I drove over and disassembled the pool the very next day. It took us a couple of trips to get it all home. And since the pool hadn't been used in well over a year (if not longer) all of the metal pieces were filled with dirt and dead bug debris. It became my job to clean them up.
I did such a great job cleaning ;)
Armed with a hose, sponge and lots of sunblock, I spent one sunny afternoon scrubbing away. Ironically this is the exact kind of work that I wanted a pool for. I just kept thinking how great it would be to hop into to pool once I was done to cool off.
The pool part of the pool...just waiting to be installed!
 DH decided that we would send the metal pieces out to be powered coated since they all needed new paint. He said powder coating would last longer and protect the metal better. That was fine with me..I mean, I knew our "free pool" wouldn't exactly be free in the end. We'd still have to level our backyard and have sand delivered. Not to mention that I still have pride in our home and I wanted our pool to look it's best.

We finally got the pieces back from the powder coating place..and WOW. They are amazing.  I want to powder coat everything now. I just love the look of it. Especially the white pieces that are the top rail of the pool. I can envision myself with my arms folded over resting on those rails.

We've already picked the perfect spot for the pool, so the next step is to dig the hole and order sand!!

Stay tuned for pool updates.

Tuesday, June 9, 2015

Baby Quilt

Earlier this year a friend of ours had a sweet baby girl. So naturally I made them a quilt.
The colors of their nursery are pink and gray, and it was so fun using those two colors together.

Baby Quilt
I used fleece on the back so that the quilt would be super snugly. Plus I just love love the look of quilted fleece.

Quilted Fleece


The pattern that I used for this quilt is "Argyle" from the book " Simply Modern Christmas by Cindy Lammon. I adore this book, it is filled with patterns that I just can't wait to try. Have you made this quilt pattern? If so, please send me a photo, I'd love to see it. 

Have a fun filled week!
- Kat  :)

Wednesday, May 20, 2015

The Non-Buisness Sign, Sign.

We live in an association with rules. Lot's of them. And one of those rules is that you are not allowed to have business signs displayed on your property. So I've been trying to think of a way to let my new longarm customers know that they have indeed driven to the right house with out putting up a business sign.

I've always wanted a giant barn with a giant quilt block painted on it. (In my dream world, the barn is my studio, and it's filled with gleaming hardwood floors, lots of cabinets and amazing light coming in through the many windows. Yes, my dream barn has windows).  We don't have a barn. But my husband does have a tall wood shop. And when we bought the place, he promised me I could paint a big quilt block along either one of the sides of it..or on the back. Well that's all good and dandy, but you wouldn't see it from the road. Quilting customers might still think they are lost (the association has lots of roads..newcomers always feel overwhelmed when driving the neighborhoods).

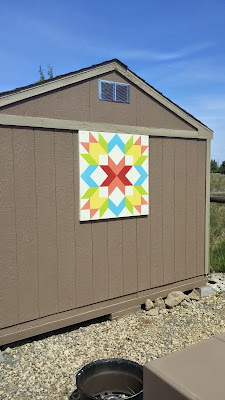
Then I remembered the shed. That's right..the house came with a shed, one that my husband wanted to move from the front of the house to the back, but he hasn't figured out an easy way to do it...and neither of us want to dismantle it to move it. So the shed stayed put, and I decided that it was the perfect place to put my painted quilt block. It's easily seen from the road so anyone driving by knows that a quilter lives in this house.
Quilt Block Shed Art
Ta-Da!! The Quilt Block!
 My amazing husband did most of the manual work on the quilt block (which in my head is my business sign disguised as art. Rule Loop Hole). He cut and sanded the wood for me. He drew the quilt block that I had picked out onto the wood. He painstakingly blocked off each and every area to be painted.
Quilt Block Shed Art
 I painted. Okay, he did a lot of the painting too. My husband did about 98% of the work on this quilt block, including hanging it up. He's amazing. I really am blessed.
Quilt Block Shed Art
My handsome husband painting away.

I'm so happy with how it turned out. I smile every time I pull into the driveway. And to my husband...Thank You Jeff. The quilt block is exactly what I wanted. You are the best. I love you.
Quilt Block Shed Art
My super amazing awesome Quilt Block Shed art in all it's glory.

Tuesday, April 14, 2015

Inspired by a 6 year old

Last week our family from WI came out to visit us. We had a week filled with fun and love. At one point my 6 year old niece called out to me. "Auntie Kat...come look at me." I turned around but didn't see her. When I asked her where she was she replied that she was in the tree.
My giggling niece high up in the tree.

L had climbed rather high, in a nearby tree all by herself.  To say I was shocked would be an understatement. I can't recall a moment in my life where I wanted to climb a tree. I'm not so much afraid of heights as I am afraid of falling and getting hurt.

She loved posing for photos in the tree. I adore her.
I asked her, "Why are you climbing the tree?" Her smiling response was "If my brother can do it, why can't I?" That was when I realized, she never once thought about falling, she didn't think about getting hurt, she only thought about climbing for fun. Nothing was going to hold her back. Wow. I was just taught a life lesson by a 6 year old. I can use a lot less fear in my life, a lot less "what if's" and a whole lot more courage to just go for it.

I doubt she realized how much of an impact her statement had on me. Hopefully it's a lesson I'll remember for a long time. Thanks L, for being so inspiring, I can't wait to see what great amazing things you are going to accomplish as you grow up.


Sunday, March 22, 2015

Crayons and Fabric

I belong to the Central Oregon chapter of The Modern Quilt Guild (it's a fabulous quild....the Modern Quilt Guild has chapters all over, check them out on their website) and our quild has decided that we should have name tags that have our logo on them. That way, when we are at events together everyone will know that we all belong to the same quild.

We were given a white piece of fabric with our logo printed on it and told to decorate it anyway we wanted.  My immediate thought was colorful and sparkly.  So I dug out my crayons. Yes crayons.
Modern Quilt Guild Name Tag
 Using the technique in Terrie Linn Kygar's book I colored in my name tag (my Mom and I saw watched Terrie demo this technique at a quilt show last year and I'd been itching to try it out).

Then I fused it to tim tex, fused on some backing, and sewed a sparkly ribbon around the edges.
Modern Quilt Guild Name Tag

Next I wrote my name out in hot fix crystals.

Hot Fix Crystals
Then I applied the crystals (and glued a pin onto the back)

Modern Quilt Guild Name Tag
Perfect. I'm sew excited with how it turned out and I can't wait to show the girls at our next meeting.


Happy Sewing everyone!

- Kat  :)


Tuesday, March 17, 2015

Applique Embroidery Designs Tutorial

Watch this tutorial to learn just how fun and easy it is to stitch out applique embroidery designs.

Sunday, March 15, 2015

Hawaiian Quilt Blocks - done!

I finally finished two wall hanging's that I had in my unfinished project pile for a while. A long while.....6 years to be exact.

Back in 2009, my Mom and I attended the Original Sewing and Quilt Expo in IL. (It's still one of my favorite shows)...and we took a class by Kathy Kansier on how to make Hawaiian Quilt Blocks.

Quilt Block
Kathy Kansier and myself with the block that I made in class.
One of the tips Kathy gave was that if you carefully cut out your shape, you can use the outer fabric to make a 2nd block which would be the 'negative' of your original block. I loved this idea and was super careful when cutting out my shape.

Quilt Block
My two blocks.

My original intent had been to add borders to both blocks and make two wall hangings. I had thought about doing embroidery in the borders, but I changed my mind and unsure what to do, the unfinished wall hangings sat on the shelf. And then they got packed up and moved to Oregon. And then unpacked and put on another shelf.
Quilt Block
My amazing Mom working on her block. It was so much fun taking this class with her.

Quilt Block
Me and my Mommy.

Quilt Block
Working on my block in class.


Quilt Block
Me sewing during class. I love sit & sew classes, I always learn so much.

And then last month I was looking for something else and I came across them. Suddenly inspiration hit, and I knew just what to do with them. I put them on my longarm, and had a blast quilting them.
Longarm Quilting
I love this quilt pattern in the border.
Longarm Quilting
Quilting away!

Now they are  hanging in my studio. Their original destiny finally fufilled. It may have taken me 6 years, but they look fabulous! After all, done = beautiful!
Hanging in my studio!


Wednesday, March 4, 2015

Paper Piecing Tutorial

Paper Piecing Tutorial
 I created this tutorial because one of the quilt groups that I belong to is making a charity quilt and it's going to be all paper pieced. Some of the woman haven't paper pieced before, so I promised to teach them. This video goes along with the hand out from the class, however you do not need the hand out in order to follow along. Enjoy!  - Kat  :)

Monday, January 19, 2015

Which embroidery machine do I buy?

Whether you are new to the world of embroidery or you've been embroidering for years, buying a new embroidery machine can be overwhelming.  There are so many brands and models to choose from. How do you pick the right one?  The answer is: Test Drive, Test Drive, Test Drive.

Every chance you can sit down and sew/embroider on the different brands/models of machines. If you live by a dealer, visit the dealer and sit in front of the machine yourself. Ask to press the buttons and thread the machine. Ask if you can change the bobbin and load a design. All things you want to be sure that are user friendly enough that you can do them at home when the dealer is no longer standing right next to you. (Most dealers offer free classes if you purchase the machine from them.)  Quilt shows are a great place for test drives, as the top manufacturer's are usually at most shows. You'll be able to sit down and sew on many different brands and models all in one day.

Ask a lot of questions, and decide what features are important to you. Perhaps you don't need a thread cutter, but really want an auto threader. How many feet come with the machine? What is the average price of new feet? What file format of embroidery design does the machine take (this is mostly important if you already have a machine, as you don't want to find out your entire library of designs is incompatible with the new machine.) Does it have a color screen or b/w? What hoop sizes come with the machine? How many built in designs does it come with? Does the machine have the ability to edit designs (making them larger or smaller, rotating them,. combining two designs etc.)

If you are at a quilt show that provides the machines for classes, then be sure to take some of those classes. Not only will you be able to sew/embroider on that particular machine for an hour or more, but most shows have special deals on the machines that are used in the classroom as they don't want to pack them all back up and ship them home.

One of the great things about sewing and embroidery machines is that much like cars, if/when you are ready to upgrade to a newer model, you can trade in your old machine towards the new one!
And much like cars, machine manufactures come out with new models of machines almost every year. There are always new features to discover.

Bottom line, test drive as many machines as you can, ask lots of questions and you'll be sure to find the perfect machine for you and your budget.

Happy Shopping!

- Kat


Tuesday, January 13, 2015

Monday, January 12, 2015

Party Hat Tutorial

Saturday, January 3, 2015

Leaping Lizards! She's on the counter!

My husband and I have 3 dogs, and each one is completely different from the other. Each one is amazing, funny and loving. Like people, they have their strengths and weaknesses, and best of all we can always and count on them to snuggle up with us at the end of the day.

Our oldest George doesn't really play with toys that much, he loves hiking and napping. He does however have issues with small dogs, and sometimes barks non-stop for no reason. So we've learned to keep him out of dog parks, and he doesn't go places in public that could have small dogs. The barking we continue to work on and we adapt on the fly with him.

Cali is the middle doggy. She was born deaf, has allergies, her bladder is in the wrong spot so she takes incontinent medication and as a puppy she was a chewer. She's getting older now and doesn't chew as much, but she still loves walks and toys. She's taught us a new way of communication as we use doggy hand signals with her (much like sign language) and we've had to learn ways to get her attention since we can't just call out her name. When it comes to communication you can never have too many ways to get your ideas across.

Skylar is the puppy....full of energy, she likes to jump and she loves to chew. We've gone through countless toys over the past few months. She mastered climbing over baby gates at just 10 weeks old. We take lots of walks, and play many games of fetch, not to mention tug of war. She loves that game!

Over the months the long walks and high speed chasing of tennis balls through our dessert backyard has strengthened her legs.  She's also lean...and long. Unlike the other two dogs who's deep Boxer bellies keep them from jumping too much...Skylar can jump. And she's jumping higher and higher every day.

You see where this is going right? The other night I'm in the kitchen making dinner, when suddenly with a small running start Skylar jumped up onto the counter and slid across the stove, stopping right next me. "Can I have some meatloaf too?"

I called out to Jeff so he could see what she had done, and he burst out laughing. We've never had to worry about a dog being on the counter if there wasn't furniture in front of it that they could climb onto. In that one moment...the whole way we store things changed. No more just putting items we don't want the dogs to eat up high on the counter. I spent the rest of the night moving items off of the counter and finding new homes for them. We can't have Skylar eating the Kurig K-cups now can we??

This puppy is going to teach us lots of things. Starting with patience and different way of organizing. I'm guessing we are going to learn lots this year. What has your dog taught you? Has anyone else had to re-arrange their entire kitchen?

-Kat  :)


About Me

My photo
I love all things crafty! Visit my website www.calicocali.com for tutorials, longarm quilting, svg designs, embroidery designs, nail decals, notions and more. Let’s Be Friends! Follow us on Facebook: www.facebook.com/calicocalidesigns/ Follow us on Instagram: www.instagram.com/calicocalidesigns/ Subscribe to our Youtube channel so that you don’t miss out on any of our fun tutorials! I hope you love our designs as much as I enjoy creating them. Happy Sewing Everyone!!! – Kat 🙂