2014 was a year of new things for my husband and I. We moved to a new state, he got a new job, we got a new house, and we added a new puppy to our family. We made new friends, discovered new places to visit, new restaurants to eat at. I joined my first ever quilt guild, as well as another quilt group.
I finally tried trail mix..and guess what? I love it and it's now my go-to snack. I also feel in love with hiking. I learned how to quilt on a longarm machine. I tried other new foods as well. Some I liked, some I did not. I learned some new digitizing techniques and had my first booth at a quilt show. Like I said..it was a year filled with new things.
And now 2015 I just a day away. I'm looking forward to experiencing even more new and exciting things. Instead of resolutions, I'm setting goals this year. So here goes...my official list of 2015 goals!
*Spend more time digitizing (which in turn will produce more embroidery designs for www.calicocali.com)
*Finally get long arm pantographs to work so that I can digitize and sell those on my website too. (I've been working on this for months but I've run into a few snags. Hopefully 2015 will sort those snags out so I can move forward on this one.)
*Get into a routine with the puppy. I love our puppy...she's amazing. But she's also a bundle of energy...with two senior dogs in the house I'd gotten used to being able to do what ever I needed to do while they napped all day long. Now, just carrying a basket of laundry across the room is a game to Skylar. "Jump, Jump, Jump, Let's Eat All The Laundry!" Ugh. Deep breath. So for 2015 my goal is to have even more patience with her and get into a set schedule of walks and hopefully naps so that I can work on the above goals with out her chewing up the wood work the moment my back is turned.
*Like most of my quilty friends, I would like to make a dent in the unfinished projects pile. I'd also like to make quilts for charity. Both the quilt guild and the quilt group that I belong to make and donate quilts to charity. This year I was only able to make and donate 2 quilts to charity and next year I'd like to make a lot more than that.
*I suppose I should add "Blog More" onto this list as well. I can't believe I didn't post one thing in all of December. Whoops!
*My last goal is more of a fun one. I'm hoping that DH and I can take a vacation.We usually travel a lot, and take lots of long weekends to go camping. But this year because of the move and settling into our new house we weren't able to go anywhere. So here's hoping that 2015 brings us a nice balance of routine, new adventures and maybe just maybe a trip to Vegas or someplace "just for fun"!
Happy New Year Everyone!! Here's hoping all our dreams come true!
-Kat :)
Tuesday, December 30, 2014
Thursday, November 27, 2014
60% off Black Friday Sale
This years Black Friday Sale is soo big, we are running it all weekend long. That's right, 3 days of savings, Friday, Sat and Sunday save 60% off your entire order by using coupon code BLACKFRIDAY at checkout. Treat yourself to some new machine embroidery designs today at www.calicocali.com.

Monday, November 24, 2014
Water Soluble Stabilizer Tutorial (embroidery on towels)
Friday, November 21, 2014
Which brand of embroidery thread do I buy?
Recently, a customer asked me what I thought about a particular brand of embroidery thread. That's such a great question, so I thought I'd share my answer here with all of you.
In my opinion, there is no 'right' or 'wrong' brand of embroidery thread. Just like there are lots of different sewing machine makes and models, there are many different brands of thread and you just have to find the brand that works for you. Not all brands will run smoothly in your machine.
When buying a brand of embroidery thread that you haven't used before, I recommend buying only a few spools of it and actually running it on your machine before buying a lot of that brand. In fact, it's great if you can buy a few spools of a multitude of brands. Use the different brands of threads and stitch out the same embroidery design with each brand.
Then you can step back and evaluate each brand of thread. How did your machine like that thread? Each brand of thread will run differently on your machine. Not all machines 'like' all brands of thread. After you stitch out the design, ask yourself these questions:
Ask yourself this after using each new brand of thread. And if you are using the same embroidery design it will be easy to lay them all out and compare the quality. Then you can buy what ever brand you and your machine are the happiest with. There's no judgement based on what brand thread you buy...all of the brands are good, you just need to find the one that works best for you and your machine.
Quick story, when I lived back in Milwaukee, an embroidery club member and I had the same exact sewing machine, same exact model and everything. I loved using a particular brand of thread, but every time she used that brand it gave her nothing but trouble. It constantly broke on her, she got tangles and thread nests. She tried the brand multiple times (just in case she had gotten a bad spool). But in the end it only gave her grief, so she stopped buying and using that brand of thread. I still use that brand to this day and I've never had the problems that she had with it. So that just goes to show you, that each machine has a 'mind' of it's own. And like a lot of things in life, you'll learn by trial and error.
Good luck with your thread search..and most of all have fun with it! I love looking at all the colors of thread. Soo pretty! The hardest part is choosing which colors to buy.
Happy Stitching everyone!
- Kat :)
In my opinion, there is no 'right' or 'wrong' brand of embroidery thread. Just like there are lots of different sewing machine makes and models, there are many different brands of thread and you just have to find the brand that works for you. Not all brands will run smoothly in your machine.
When buying a brand of embroidery thread that you haven't used before, I recommend buying only a few spools of it and actually running it on your machine before buying a lot of that brand. In fact, it's great if you can buy a few spools of a multitude of brands. Use the different brands of threads and stitch out the same embroidery design with each brand.
Then you can step back and evaluate each brand of thread. How did your machine like that thread? Each brand of thread will run differently on your machine. Not all machines 'like' all brands of thread. After you stitch out the design, ask yourself these questions:
*Did the thread break a lot?
*Was there a lot of lint in your bobbin casing when the design was finished?
*Did the thread get tangled a lot?
*Do you like the quality/look of the stitch out?
Ask yourself this after using each new brand of thread. And if you are using the same embroidery design it will be easy to lay them all out and compare the quality. Then you can buy what ever brand you and your machine are the happiest with. There's no judgement based on what brand thread you buy...all of the brands are good, you just need to find the one that works best for you and your machine.
Quick story, when I lived back in Milwaukee, an embroidery club member and I had the same exact sewing machine, same exact model and everything. I loved using a particular brand of thread, but every time she used that brand it gave her nothing but trouble. It constantly broke on her, she got tangles and thread nests. She tried the brand multiple times (just in case she had gotten a bad spool). But in the end it only gave her grief, so she stopped buying and using that brand of thread. I still use that brand to this day and I've never had the problems that she had with it. So that just goes to show you, that each machine has a 'mind' of it's own. And like a lot of things in life, you'll learn by trial and error.
Good luck with your thread search..and most of all have fun with it! I love looking at all the colors of thread. Soo pretty! The hardest part is choosing which colors to buy.
Happy Stitching everyone!
- Kat :)
Sunday, September 14, 2014
Longarm Lessons
One of my goals/dreams has been to be able to add longarm quilt pantograph designs and quilting services to my business. Every time I attend a quilt show I drool longingly over the longarm machines. I've even picked out the exact one I hope to someday buy.
Now, thanks to my amazing neighbor and friend Donna (from Add the Right Touch) I'm taking steps to make my dream come true. Donna owns Add the Right Touch Quilting and she's teaching me how to quilt on a longarm machine! And I mean teaching me from the ground up....everything from the business, to oiling the machine (it get's oiled every day!) and loading quilts. Not to mention the quilting itself and the computer program behind the machine.
Donna knows about my plans to one day add quilting services to my business, but she's not concerned about the competition. She simply wants to pass along her love of the craft. I told you she's amazing. She is willing to share her knowledge and I'm so fortunate to be able to learn from her.
Here are a few things that I've learned so far.
Happy Quilting!!
- Kat :)
Now, thanks to my amazing neighbor and friend Donna (from Add the Right Touch) I'm taking steps to make my dream come true. Donna owns Add the Right Touch Quilting and she's teaching me how to quilt on a longarm machine! And I mean teaching me from the ground up....everything from the business, to oiling the machine (it get's oiled every day!) and loading quilts. Not to mention the quilting itself and the computer program behind the machine.
Donna knows about my plans to one day add quilting services to my business, but she's not concerned about the competition. She simply wants to pass along her love of the craft. I told you she's amazing. She is willing to share her knowledge and I'm so fortunate to be able to learn from her.
Here are a few things that I've learned so far.
 |
| Quilting on a sunny fall afternoon. #loveit |
- Always cut your batting 6 inches bigger than the quilt top on all sides. I learned this one the hard way. I had my backing big enough...but not the batting. Whoopsie!
- When doing free motion quilting don't look at the needle. Instead, look ahead of the needle to where your want the stitches to go. This lesson made a huge difference in my quilting. I could see the improvement right away.
- If you go too fast the thread will break, but if you fmq to slow then your lines are all wobbly. This is my biggest challenge right now, just learning the flow of her machine and figuring out my own speed and rhythm.
- Be true to yourself. My own quilting style has always involved lots of loops and swirls. They are my favorite. Donna was teaching me a new design that I had never done before, and long story short I got down to the last two rows of the quilt top and was still struggling with this design. You would have thought that I had never quilted before (it was that bad). Then I accidentally got myself stuck in the corner of a block, and I automatically did what I would have done on my domestic machine - I added in a loop and moved along to where I needed to be. Guess what! Adding in that one little loop suddenly made the design work for me. For remainder of the quilt I altered the design to include loops and they were so much better and I was no longer ashamed of the quilting (I'm telling you those first blocks were awful). I still look forward to trying and learning new designs, and I know it takes lots and lots of practice to master a new design. But this was a nice reminder to myself that if a design just isn't working for me then it's okay for me to change it to something that does work for me.

This was the design that kept giving me challenges. This is one of the 'better' blocks I did before adding in the loops.

Another photo of the design pre-loops.

I figured out I could add loops!! This one isn't close to perfect by any means, but it made me happy.
 |
| The finished quilt top |
 |
| The back. It looks fantastic from this distance. ;) |
Happy Quilting!!
- Kat :)
Saturday, September 6, 2014


Thursday, August 7, 2014
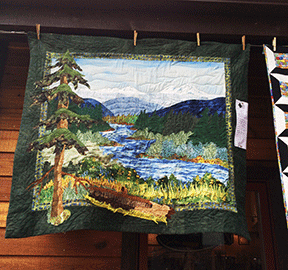
Sunriver Quilt Show recap
Last weekend I had a booth in the Sunriver Quilt Show, at the
Sunriver resort in OR. I had lots of fun. Thank you to everyone who came
out to visit me, say Hi, view my quilts, and purchase designs. I
appreciated seeing each and every one of you, and I loved talking to all
the different quilters/embroiders that stopped by my booth.
My Mom hung out in my booth with me all day (aren't Mom's the best?) so I was able to sneak out to admire all the quilts. They were amazing!! Here are some of (okay a LOT of) the photos that I took on my walk around the show. I hope you find them as inspiring as I did. Enjoy!!
- Kat :)


My Mom hung out in my booth with me all day (aren't Mom's the best?) so I was able to sneak out to admire all the quilts. They were amazing!! Here are some of (okay a LOT of) the photos that I took on my walk around the show. I hope you find them as inspiring as I did. Enjoy!!
- Kat :)
Saturday, July 26, 2014
Smith Rock


I'm not gonna lie parts of it were a bit challenging, I fell twice but didn't get hurt. And strangely I had fun. Look at that, I tried something new and I liked it...maybe my husband has been onto something all these years. The views were amazing. Here are some of the photos that we took.


Happy Weekend - get out and try something new! You never know what you'll learn/discover. It could be amazing.
-Kat :)
Tuesday, July 1, 2014
Make your own adhesive stabilizer
Today's Tuesday Tip, is about making your own adhesive stabilizer.
#embroidery

#embroidery
Thursday, June 26, 2014


S'mores "cupcakes"
S'mores are one of my favorite desserts, but with a fire ban here all summer long I'm forced to make them in the microwave. And while they taste okay from the microwave, they are not consistent. The marshmallow doesn't 'toast' as much as it expands into a 'melty pile'. And the chocolate does not melt at all.
So I tried switching to Fluff and I started using hot fudge sauce in place of chocolate.

The hot fudge sauce worked well, but it's still not the same as a milk chocolate candy bar, and the fluff was a bit too sweet for my taste. I think those two ingredients work best with ice cream.
Since I'm fast losing faith in the microwave s'more, I decided to move this party to the oven and make them in a jumbo cupcake pan.
 They turned out amazing!! I can't believe I didn't think to try this sooner. Here's how I made my S'mores "cupcakes".


Enjoy - Kat :)
So I tried switching to Fluff and I started using hot fudge sauce in place of chocolate.
The hot fudge sauce worked well, but it's still not the same as a milk chocolate candy bar, and the fluff was a bit too sweet for my taste. I think those two ingredients work best with ice cream.
Since I'm fast losing faith in the microwave s'more, I decided to move this party to the oven and make them in a jumbo cupcake pan.
*Preheat oven to 350 degrees.
*Line a jumbo cup cake pan with paper liners.
*Crumble 1/2 a graham cracker into each liner (one square = 1/2 a cracker).
*Chop up a milk chocolate candy bar and add on top of the cracker. I didn't measure here, I just added in what looked good to me. I dont think there's such thing as too much chocolate.
TIP: You can also use milk chocolate chips if. For more variety, try carmel chips, dark chocolate chips, peanut butter, chips white chocolate chips or butterscotch chips.
*Place 3 marshmallows into each liner.
*Cover with a piece of aluminum foil, tent it so that it doesn't stick to the marshmallows.
 |
| The tent keeps the marshmallows from baking too fast and burning. |
*Bake for 5 min with the tent on....remove tent and bake for another 5 min. Please note..the exact times may vary depending on your oven..so keep an eye on them through the oven door. If your oven runs hot..you can pull them out early...or if need be keep them in longer. Also if you use mini chips or mini marshmallows your baking time will be less...bottom line just keep a close eye on them.
* Remove from oven and immediately add another 1/2 square graham cracker to the top. Crumble it...or use it as as scoop. Which ever you prefer. They both taste great.
*Eat while warm...yummm!!
Enjoy - Kat :)
Subscribe to:
Posts (Atom)
About Me

- Calico Cali Designs
- I love all things crafty! Visit my website www.calicocali.com for tutorials, longarm quilting, svg designs, embroidery designs, nail decals, notions and more. Let’s Be Friends! Follow us on Facebook: www.facebook.com/calicocalidesigns/ Follow us on Instagram: www.instagram.com/calicocalidesigns/ Subscribe to our Youtube channel so that you don’t miss out on any of our fun tutorials! I hope you love our designs as much as I enjoy creating them. Happy Sewing Everyone!!! – Kat 🙂