Tuesday, December 8, 2020

Tiered Tray Tuesday

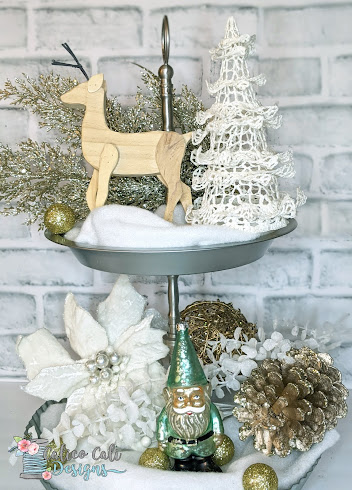
 It's Tiered Tray Tuesday!! I've skipped a few Tuesdays, but this week I'm ready!

I've been looking forward to making Christmas trays for weeks, so it was pure joy when I finally had the chance to sit down and play with all of my holiday decor to make this.

My favorite part of this tray is the teal gnome on the bottom. I spotted him in Sisters, Oregon while shopping with a friend. I love gnomes, and the moment I saw him I just 'had' to have him. 

What is your favorite decoration this year??


-Hugs,

Kat  :)


Monday, December 7, 2020

Happy Birthday to Me!!!


Happy Birthday to me! Happy Birthday to me!

Today is my birthday, and you get two sales!

That's right two sales today! I've extended the  $5.00 off any purchase sale through today
(min $10.00 purchase, one coupon code per customer)

AND I'm added in a coupon good for $5.00 off longarm quilting!
(one per customer, must present coupon at time of drop off)

Spend a min of $10 on any item(s) on my website and get $5.00 off!


This deal even includes items that are already on sale!

Add a min of $10 worth of products to your shopping cart and use code birthday to activate this deal at checkout. (one coupon code per customer)

Remember this deal ends tonight!

$5.00 off longarm quilting!

Print this coupon and bring it with you when you drop off your quilt, and save $5.00! (one per customer, not valid on past quilts)

I also accept quilts by mail!


Contact me for more info.

Tuesday, November 3, 2020

First Tiered Tray Tuesday of November


Thumbs up if you love Tiered Tray Tuesdays!!!!
Here is the first tiered tray for Nov. This one is extra special because of the cow.

There is a very sentimental story behind the cow...the man who was like a Grandfather to me, had one on the dashboard of his Cadillac. I spent lot of time with him and his wife, and we had so many fun outings together.

I remember watching the cow's head bob around as he sang "take me home again Kathleen" at the end of each of outings. Those outings were filled with love and fun, and I have such fond memories of the time I spent with them both.

After they passed on, I searched and searched to find this cow...and it reminds me of those simple, fun filled days. Every now and then I walk by it and just gently tap the cow on the head, watch it bob around and smile.
 
-Virtual Hugs Kat  :)
 
PS. The Thankful candle was made with my SVG file...you can purchase it here.
 

Friday, October 30, 2020

Quilt with me - Judy's Around the World Quilt


Judy brought me this amazing paper pieced quilt that she made for a family member.

The moment I saw it, I knew it had to be custom quilted.

This quilt received the trifecta of custom quilting….it got a lot of free motion quilting, a little bit of ruler work, and some computerized quilting.

Watch the video for the before and after photos of this amazing quilt!


Wednesday, October 28, 2020

Trick or Treat - Surprise FREE embroidery design

free embroidery designsHalloween is my favorite holiday, and since there isn’t any Trick or Treating this year, I’m sending the “Treat” to you via a surprise FREE Halloween embroidery design!!!

This applique skull design is so much fun. It’s 5.21″ wide X 7.06″ tall. I’ve stitched it out with pink sparkly felt, black fabric, white fabric and once I even used black lace. Talk about a stunning design!

If you stitch out this design, please share a photo of it with me on Facebook. I’d love to see what fabrics you guys all use with this design.

You can download this freebie at:  https://calicocali.com/product-category/free-designs-and-patterns/ 


Happy Halloween everyone!

-Kat


Monday, October 19, 2020

Quilt along with me - quilting a baseball themed table runner

 Have you ever wondered what it was like to use a longarm quilting machine??

 Quilt along with me as I quilt this baseball table runner on my Gammill Statler Stitcher Longarm machine. Includes before and after photos!


 My mission at Calico Cali Designs is to "inspire creativity one project at a time." Creating things makes me happy, it feeds my soul and I want to pass that along to you guys. 

I also want you to use those machines, press those buttons, learn new things, and have FUN while doing so!

 I specialize in longarm quilting, SVG cuttable designs, and machine embroidery designs. 

Be sure to subscribe to my Youtube channel so that you don't miss out on any of our fun tutorials!

 Let’s Be Friends! 

Follow me on Facebook: www.facebook.com/calicocalidesigns/ 

 Follow me on Instagram: www.instagram.com/calicocalidesigns/ 

Subscribe to my YouTube channel www.youtube.com/c/calicocalidesigns 

Visit my website for svg cuttable designs, longarm quilting services, embroidery designs, notions, tips, tricks and a whole lot of fun! http://www.calicocali.com/ 

Click here to learn more about me: https://linktr.ee/CalicoCaliDesigns

Friday, October 16, 2020

Make a doggy treat jar


Learn how to easily apply vinyl to a curved surface while making this doggy treat jar! You dog will thank you :) 

This tutorial teaches you how to use adhesive vinyl on a glass jar, and apply it easily with our trick! 

The design used in this video can be found on my website:

 https://calicocali.com/product/dogbundle/ 

You get all six instantly downloadable svg cuttable designs for only $8.00 

Let’s Be Friends! Follow us on Facebook: www.facebook.com/calicocalidesigns/ Follow us on Instagram: www.instagram.com/calicocalidesigns/ 

Subscribe to our YouTube channel www.youtube.com/c/calicocalidesigns 

 Visit our website for svg cuttable designs, longarm quilting services, embroidery designs, notions, tips, tricks and more! http://www.calicocali.com/

Monday, October 12, 2020

How to tie dye foam pumpkins with acrylic paint - an easy acrylic pour tutorial for beginners

I've been wanting to try something new with all of the foam pumpkins that I have, so I decided that I would paint them with acrylic paints.  But not just any kind of painting....tie dye painting.

The easiest way to do this is with an acrylic pour. 

So I bought the pour medium and some new paints and had a blast! 

It was so much fun that I decided to share with you all, just exactly how I did it. (hint - it is so super easy you won't believe it)

Of course once I was done I had to add glitter and flowers...I can't make a holiday decoration and NOT include glitter.  If there isn't any glitter on the floor what will my husband complain about???

Ha ha ha just kidding, he's actually really great considering the amount of glitter trails that I usually leave around the house... click on the photo below to watch the video tutorial! If you make one, be sure to share a photo of it with me on Facebook!


Tuesday, October 6, 2020

How I turned a place mat into a quilt

Fall is my favorite time of year, the crisp air, the beautifully colored leaves, candy, and of course Halloween!! Every year I make myself a new small Halloween themed quilt to hang on the wall of my studio. When quilting for myself I tend to stick to smaller projects that are faster to complete so that I have more time to spend on client quilts.

This year, I decided I wanted to quilt a fall or Halloween themed panel as I didn't really have the time to piece anything. I wanted a simple and fast project.

So I headed out to my local quilt shop and I found Fall themed place mats! The came as a set of four.  The moment I saw the sample hanging on the wall at Sew Many Quilts (located in Bend, OR) I 'knew' I just had to quilt it.   I bought the panel, and cut it up into the four mats...and then I quilted two (one for my wall, and one to hang elsewhere). I saved the other two for another time.

I dropped the belts on my Statler and free motion quilted them. It. was. so. much. fun.

Halloween Quilt

Using matching thread, I traced over each line in the pumpkins, and stitched more definition into each of the raven's wings.

I then used orange thread to "outline" the spiderweb border. Basically stitching in between the printed web lines.

You can really see the custom free motion quilting when you look at the back of the place mat wall hanging. back of quilt

When I was done with the actual quilting and binding, I wanted to add some bling to the quilt, really make it catch people's eye. If you know me in real life, you know how much I LOVE glitter. But it's not very feasible to add glitter to a quilt. So I did the next best thing, and I took out my stash of hot fix crystals and my little hot fix crystal iron.

I played around with different size crystals and different colored crystals, as well as possible places to glue the crystals to with in the quilt. After a few minutes of playing with the crystals, I had the perfect plan in place.

First, I added deep orange/reddish hot fix crystals to the eyes of each of the Ravens. I feel that the color contrast between the Raven and the crystal on it's eye really makes the Raven stand out better. halloween quilt

I really love how the Ravens turned out. So next, I turned my attention to the pumpkins. The smaller pumpkin in the foreground already had black dots in it, which were begging to have crystals.  I didn't cover each and every dot, but I did add a bunch of black hot fix crystals on top of some of the dots.  Just enough to add some sparkle and draw your eye in.

Not wanting to over-do it with the crystals, I stopped there.  As much as I love them, I still wanted the quilting to be the overall star of the show. But the quilt still was not "done" there was one more section that I felt needed to be enhanced a bit.

cyrstal quilt

 I wanted to embellish the spider. I did quilt him by outlining his body and tracing over each of his legs.

 However, I wanted him to really pop and stand out.  I didn't want to cover him in crystals, and I thought about putting an applique on top of him. I toyed with the idea of a fuzzy fabric over his body, but that didn't seem to be what I was looking for.

Then I got the idea of a spider ring! I had a bunch of those inexpensive plastic spider rings in a drawer, leftover from a previous Halloween Party. So I dug them out and I cut the plastic "ring" part off and glued the just the spider part to an old pin back. Once dried, I simply pinned him to the quilt.

I love the end result. That little spider "ring" adds the right amount of 3D texture to the quilt.  It magically completed the quilt and pulled the whole thing together.

spider quilt

And...just like that I turned a place mat into this year's fall/Halloween themed wall hanging! This is fast and easy project that you can do to! If you make one, share photos with me on Facebook!


Here is a glimpse at the quilt hanging on the wall in my studio. It matches my coffee cup nicely, if I do say so myself.  I hope you enjoyed this post. Visit my website for more inspiration: www.calicocali.com

my studio

Thanks for reading!    -Kat  :)

Sunday, October 4, 2020

Smokey yard and Smokey the Bear Quilt

Smokey yard and Smokey the Bear Quilt

smokey bear quilt

A few weeks ago I the pleasure of quilting a Smokey the Bear Quilt. The timing could not have been better, because Oregon was covered in smoke from our own wildfires, and the ones in California.smokey bear quilt

This fire season was hard for me. There were so many fires, and they grew big, fast. The skies were gray and gloomy, filled with smoke, ash and all sorts of bad stuff that made it difficult for me to breathe with my asthma. I honestly spent most of the days in bed listening to the sounds of the airplanes flying overhead and updating my evacuation list (list of things to pack if we were evacuated). Luckily for us, the fires didn’t get close enough to our town and we didn’t have to leave our home. So many other people were not as lucky and are still not able to go back to their homes yet. 

Those planes that I mentioned above drop water on the fires, and they re-fuel and fill up with water at our local airport. For days anytime you were in town you would see multiple planes taking off and landing. Of course once it gets too smokey they can’t fly. And then it feels like everything gets worse.willd fire smoke

Just look at the photos of the smoke that I took from my house. I initially took these photos to share with my family back east, but I think it’s good that everyone sees them, so that we can all understand just how important fire safety is. Make sure those camp fires are out, don’t toss cigarettes out car windows, and be extra careful with anything that can spark.wildfire smokewildfire smoke

When I saw this quilt, I was extra motivated to quilt it just because of everything that was going on right here in Oregon.  Smokey the Bear has such a GREAT message!! We need more of him around.

I can remember seeing his commercials on TV as a kid, in Massachusetts.  Mass doesn’t have a wildfire problem and I’ve yet to see one of those commercials since living here in Oregon.  I think we need to start a movement to bring Smokey the Bear back to TV!  (or maybe he is back and I’m just watching the wrong channels????)

But, back to the quilt. Just look at how fun and colorful these fabrics are, while at the same time they have such an important message about fire safety.

fabric

A lot of fires are caused by recklessness, and I just want to give Smokey the Bear a big ole hug for trying to spread the word.  As a kid, a didn’t understand just how important Smokey the Bear’s job was.

Thanks for the help Smokey the Bear! And, special thanks to my client for bringing me this quilt top to quilt. It reminded me of some childhood nostalgia that is still relevant today.


smokey bear quilt


About Me

My photo
I love all things crafty! Visit my website www.calicocali.com for tutorials, longarm quilting, svg designs, embroidery designs, nail decals, notions and more. Let’s Be Friends! Follow us on Facebook: www.facebook.com/calicocalidesigns/ Follow us on Instagram: www.instagram.com/calicocalidesigns/ Subscribe to our Youtube channel so that you don’t miss out on any of our fun tutorials! I hope you love our designs as much as I enjoy creating them. Happy Sewing Everyone!!! – Kat 🙂