Wednesday, November 3, 2010

Store Bought Christmas - Kind Of....

     Last year my husband created the rule that I'm not allowed to "make Christmas gifts anymore". Why? Because I get all stressed out about finishing the gifts on time (I still haven't finished my brother's wedding quilt and they celebrated their 1st anniversary a few months ago).
     BUT when I saw these cute little jeans on clearance I could not pass them up. If all I do is "embellish" the jeans, then I'm not really breaking the rule. Right?
     
       My plan for the jeans is to add cute ruffles to the cuff's (inspired by a few of the fabulous folks I follow on twitter) and maybe some hot fix crystals on the back pockets. I'll post photos once the jeans are done.  If I miss the Christmas deadline...I figure I can always put them in my niece's Easter Basket  :)

Thursday, September 30, 2010

Mr Toad's adventures

For those of you who may have missed it, a few weeks ago I turned my Twitter over to Mr Toad. Mr Toad had traveld all the way from Florida to WI to live with me, via one of my wonderful, amazing, super bestest friends @disfriendstitch!!!
As a fun way to thank her I decided to tweet about a day in the life of Mr Toad.
In honor of my upcoming trip to Disney, I thought I'd post those tweets here for all to enjoy. Here is a recap of his day.  
- Hugs Kat  :)


*Today's adventures are dedicated to @disfriendstitch

*Mr Toad goes for a ride in the #Mercedes. Buckle Up Mr Toad


*Mr Toad eats his vitamins so he can stay healthy and strong


*Mr Toad frantically tries to help Kat get caught up at work...


*Mr Toad goes shopping...silly Mr Toad those shoes are WAY too big for you.


*Umm Mr Toad, did you forget that you're a PC not a Mac???


*Mr Toad grabs a late lunch with a friend.


*Awww Mr Toad sends Kat's dad a special message....


*Uh Oh! Mr Toad insists on driving.


*Mr Toad chills while Kat gets her allergy shots.....


*Mr Toad loves candy


*Uh Oh Mr Toad is becoming a compulsive gambler!

 
*Mr Toad is officially obsessed with #TVD


*Nite Nite Mr Toad

Sunday, July 18, 2010

Laughing and Learning

If you follow me on twitter you know that I spent the weekend in IL at the John Deer Embroidery Extravaganza....here's my recap about the weekend. Overall the event was amazing, I had a fabulous time and learns lots of valuable information.
      John is very funny, and injects humor into every segment of the class. It's obvious that he loves to educate and enjoys sharing his knowledge of embroidery with everyone.  He has won 30 digitizing awards and has written for industry magazines. 
     John talked about making embroidery soft and not "bullet proof", he teaches the Theory of Embroidery - which are the rules for digitizing.  Even if you are not interested in learning how to digitize, these rules are important so that you can understand what goes into a "good embroidery design".  Often times when you experience multiple thread breaks, bird nesting or bad registration, it's not your fault...it's the digitizer's fault.  Poorly digitized designs will not stitch out well.
     John explained which types of stabilizers to use and when to use them. Like me, he prefers Floriani stabilizers. http://www.rnkdistributing.com/cid-35-1/Floriani-Products.html
One tip his staff gave us was to store your water soluble stabilizer in the fridge so that it last longer.  This helps prevent it from drying out, mildewing, or getting wet and sticking to itself.
      John also gave tips on using metallic thread - such as putting the spool of thread on the table or floor behind the sewing machine. The longer travel space the thread has to unwind before entering your machine - the less likely you are to have thread breaks.
      He taught and entire segment on "Making lots of $ with Embroidery". Tips for starting your own business and making sales.  He did lots of demos, including hooping demos, lace and cut work, as well as product demos.  He also did a demo on his own software "Adorable You" http://www.adorableideas.com/index.php?cPath=1134_886  This software is perfect for the person who doesn't really want to get into digitizing but wants a fast and easy (and I mean fast and easy) way to combine photographs with embroidery applique and text. All the digitizing is done for you.
      John shares his real life experiences with everyone, talks about his family, his amazing wife and wonderful grandmother. He's a master digitizer with an amazing support group of family and staff (who really seem to be more like family than staff). And although he claims to be a spoiled, only child; at the end of the event he was right there, packing up samples and equipment alongside with the rest of the staff.
     Between the free samples, give ways, fun and knowledge that I received, this weekend was more than worth the $69.95 that I paid for the class.  Every one also received a copy of his entire presentation on a CD! If you ever get the chance, I highly recommend attending one of the events that John teaches. Here is a link to his upcoming events:http://www.adorableideas.com/aievent_2010calendar.php
Want to check out John's designs? Click here: http://www.adorableideas.com/index.php

 Lastly - I have to say the Linda Z's was a fabulous host...everything was soo well organized, and it clear to me that her customers are not just customers, they are also her friends. If you are in the Chicago-land area and want to check out her store here is a link to it: http://www.lindazs.com/  She made the announcement this weekend that they will soon be moving to a larger store with more parking and it's very close to her current location. The new store will have a big classroom space. I look forward to attending future classes at her new store.
Happy Sewing - Kat  :)
Tuesday, June 29, 2010

Sewing Room face lift - part 2

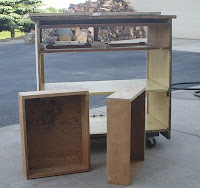
As part of the face lift to my sewing room, I'm refinishing a 1950's vintage cabinet. This particular cabinet was in my father in laws kitchen when he was a little boy. I love that it's been in the family this long...and I think that his mother would be happy that I've rescued it from the garage (where it was filled with nails and mice poo) and it will soon be lovingly used to store fun crafting and sewing supplies.
First step was stripping and sanding the cabinet.


Once I had all the old paint removed...I discovered this! An old butterfly decal had left a faded mark on the cabinet door. Like a hidden secret. But unfortunately the butterfly was not meant to stay..and it got covered up again just a quickly....my husband primed all the pieces for me.

 I love how he hung the cabinet doors from the garage so that he could paint them evenly with his sprayer.
Next step is paint!!!!

My favorite part of the cabinet (aside from the fun paint color I picked out) is the actual vintage hardware.  I'm very excited about it...and can't wait to put it back on the cabinet, and get the cabinet back into my sewing room!!!

I'll post more photos once the paint is completed and the cabinet gets put back together.

- Kat  :)

Thursday, June 17, 2010

Sewing Room Facelift - part one

I've waited a long time for this...my sewing room is finally getting a face lift!!!!
I've been wanting to replace my shelves with cabinets ever since I saw an ad for a cabinet company that showed cabinets in a sewing room. I was instantly hooked..I had to have cabinets! The one thing I really dislike is walking into my sewing room and seeing all the clutter on those shelves and getting stressed out about it.  So little by little the shelves are going away..and being replaced with cabinets!  Here is a view of the two bottom cabinets. I left a space in between them so that I can put my serger on the counter and still have a spot for my chair with out hitting my knees.  So far I love it and I can't wait to get my serger all set up and running.
I haven't decided what color counter top I want yet...and since our trailer is full of wood that needs to be chopped up...I wont be getting a counter top anytime soon. So in the meanwhile I'm using two of the shelves pushed together as a counter top. I'm actually surprised at how well they work. Maybe I'll forgo real counter tops for a while and use that $$ for more Fabric. A girl can never have too much fabric  :)

 Next step will be to hang the upper cabinets once the holes in the wall have been patched from where the shelves hung. I'll post more photos as they become available.
Happy Sewing - Kat  :)

Weekend Projects

2 weeks ago I spent the entire weekend sewing..it was fabulous.  First I made myself a new camera strap, out of girly fabric and even embroidered my name on it...hint hint hubs..it's my camera..stop changing all my settings  :)
Thanks to @priddycreations for the fab tutorial!!


Next I made myself a cute belt to wear around in Vegas..again I put my name on it..not that hubs would actually try to wear this one!!


And lastly I made myself a new purse! (One of my favorite things to do). I heart the elephant fabric and because I love the have my name on things...I also embroidered my name on it. I'm not egomaniac I swear!!


And that was the entire weekend...3 fun projects...3 great additions to my closet!  :)
Happy Sewing.
-Kat  :)

Wednesday, March 17, 2010

Messy Iron

Now I've done it. In a rush to just start playing with my brand new Sizzix Big Shot...I grabbed a pressing sheet that was too small. I foolishly thought "oh I'll just be super carfull when I iron the fusible stabilizer onto my fabric. I can do that."  NOT. Of course because all I could think about was cutting super fun shapes out of fabric..I did not pay enough attention, and ended up with fusible gunk all over my iron (and a bit on my ironing board as well). Did I mention I did all this to the "good iron" upstairs...the one that my husband uses to iron his expensive work dress shirts.  gulp.  (why oh why didn't i just use my craft iron in my sewing room. Cause I just wanted to play with the Sizzix that's why. sigh.)

  So now here am I, desperate to clean the iron up before my husband returns from his business trip and ruins his work shirts. Next step for me..internet research.

  Most of what I found on the internet said to use vinegar.  I tried...it failed. It only removed small portions and it took a long time to work...so I started experiementing with the cleaners under the kitchen sink. The winner??  Zep Cherry Heavy Duty Hand Cleaner!!

I applied it directly to the iron plate with a paper towel...and a bit of "elbow grease" and viola!! A clean Iron!! I'd go as far as to say it, actually looks brand new.  And I didn't spend a dime on fancy iron cleaners...not to mention that my husband's work shirts are now safe again.  :)  Thank you Zep!!

Happy St. Patty's day everyone!
-Kat

Thursday, February 18, 2010

Fabric at the Farm

I'm very excited about this weekend..my friend Shannon and I are going to her parent's farm. We are having and entire weekend of nothing but "Fabric at the Farm".  Shannon's mother has just about every scrap book paper cutting machine that's on the market right now...and our plan is to use them all on fabric!

 That's right..I've have a stack of fabric all pre-washed and ready to be cut into cute little shapes, which I'll later use as appliques on quilts! I've also packed my wonder under and painter's tape.

I plan on taking lots of photos and I'll be sure to post them all once we return as there is no internet or cell phone service at the farm. Just us, cutting machines and fabric!

Hugs - Kat  :)

Tuesday, February 16, 2010

Quilt Blocking

A few weeks ago I learned about "blocking a quilt". I haven't tried it yet, but it sounds like a great idea to me..and I think it will help solve that little problem I sometimes get where my quilts don't "look" square.

For a really nice tutorial on how to block a quilt…check out this mini-lesson by Sylvia Landman at Quilting University's website:  http://www.quiltuniversity.com/blocking.htm

My friend Shannon recently took a class with Ricky Tims, and it turns out that he blocks his quilts, twice. He blocks the quilt top..and then once it's dry and square he layers up his quilt, quilts it..and then blocks the stitched "sandwich" before finally adding the binding.

So with that knowledge in hand, I've decided that blocking is definitely something that I must do. So naturally I've been researching it on the internet and I've come across these "blocking boards". Being the "gadget girl" (as my mother calls me) I feel that I NEED a blocking board immediately. I simply must have one. But, do I have a quilt ready to be blocked…ummm no. Do I have a quilt top even close to being stitched together that I could in theory be blocking soon….again, no.
But yet I really really want one! So what do you guys think?  What are the pros and cons of the blocking board?

Saturday, February 6, 2010

International Quilt Festival - IL

The International Quilt Festival is once again coming to the Chicago area!! It'll be in Rosemont, IL April 16-18, 2010. I've already signed up for a class and booked a hotel! I'm extremely excited to see all of the fabulous quilts, learn new techniques and of course SHOP!!  This year I'm only taking once class, but that will leave me with the entire day on Sat just for quilt viewing and shopping. My favorite teacher Kathy Kansier will have some of her Quilts on display. She's an amazing teacher..I highly recommend taking a class with her if you get the chance. To read more about her click on the following link to her website: http://www.kathykansier.com/
For more info on the International Quilt Festival in IL, click on the following link: http://quilts.com/home/shows/viewer.php?page=SpringFestival

I hope to see some of you there! I'll be walking around with my floral "bridie sling bag" that I made from Amy Buttler's pattern. It's my favorite bag and reserved only for quilt shows and airplane trips!
If you see me, be sure to say Hi!!

Hugs - Kat :)

Wednesday, February 3, 2010

Relaxation

I’m bored. I’m not one of those people that can just sit and do nothing….my mind is always racing & I’m always doing something. As I write this, my husband is napping in a lounge chair enjoying the Florida breeze. I’m sitting in the chair going crazy with nothing to do!


One of the reasons I had such an unbelievable time at Disney World is because for once my mind stopped racing…I was 100% relaxed, not worried about anything AND I was only focused on what I was doing right then and there. Just wandering around with my mind completely turned off.

I think one of the reasons I’m soo creative is because I’m constantly thinking. But, I really want to bring that sense of relaxation into my sewing room. Maybe I should start by working on only one project at a time, truly focusing on each step and only each step as I sew that step. And not thinking 2 steps ahead, or 3 projects ahead. 

One of the ways I’m trying bring relaxation into my sewing room, is by making it less hectic. I want my shelves to be organized and everything to be neat. Which is why I’m in the process of putting in cabinets – to hide the clutter! I recently transferred all of my fabric stash from plastic bins, and put it into a gorgeous vintage china cabinet with glass doors. When I walk into the room and see my fabric with one glance… I smile. Every time.


Does anyone else have any ideas for calming…or slowing down…bringing relaxation into the creative process? If so please share!


Hugs – Kat :)

Sunday, January 24, 2010

Inspiration

Welcome to Calico Cali designs!! I’m sooo excited to be launching my blog. I’ve been inspired by all the great sewing blogs out here to start my own blog…and I hope you enjoy reading it as much as I enjoy writing it. Please check back regularly as I post tutorials and photos of current and completed projects.


I’m launching my new blog from Orlando, Florida. I’m here on vacation while my husband works at the heating and air conditioning trade show. On the flight in I read 3 sewing magazine and was soo inspired to head to my sewing studio and start up my machine…however...since I’m in Florida without a sewing machine it’s not going to happen, but I did fill my iphone with lots of notes about things I want to sew when I get home.

One of the things I’m noticing in this hotel is the amount of texture in the rooms…and it’s got me thinking ”how can I add some texture to my quilts and sewing projects?” I’m also loving the color combinations that I’m seeing and I’ve been taking lots of photos. In particular I love love love the hallway rug in the lobby and I’m hoping to recreate it as a quilt…it’s just beautiful. Everywhere I look I see something that makes me think of sewing and has inspired me to create new quilts and purses.

Tonight at dinner, I noticed the rug was dark brown with brightly colored circles on it, and it got thinking that I should make a quit with a dark brown background, with bright colored appliqués on it.

As you see things that inspire you to sew, jot them down…I encourage everyone to keep a list of their ideas and the things that inspire those ideas. I have a folder full of photos that have inspired me, and I look at them often. I’ll be posting them on here and I’d love to hear from you if they inspire you too!

Happy Sewing!!

About Me

My photo
I love all things crafty! Visit my website www.calicocali.com for tutorials, longarm quilting, svg designs, embroidery designs, nail decals, notions and more. Let’s Be Friends! Follow us on Facebook: www.facebook.com/calicocalidesigns/ Follow us on Instagram: www.instagram.com/calicocalidesigns/ Subscribe to our Youtube channel so that you don’t miss out on any of our fun tutorials! I hope you love our designs as much as I enjoy creating them. Happy Sewing Everyone!!! – Kat 🙂